( 2’x4’x2″ Acoustic Panels Mounted On These Metal Stands )
Quick story time…
I recently moved into a new apartment, and thus, had to redesign my home studio space. I love everything about this space, however, there was one main challenge to overcome…. one side wall has a wide window at the exact height where I would normally mount my 2’x4′ acoustic panels to the wall using picture hooks.
After lots of considerations, I decided I would use a floor stand to “float” the panels in front of the window. This had the added benefit of making these panels portable so I could move them around the house as gobos for all my sfx recording shenanigans.
Looking into DIY methods, that path just kept adding up in both time and costs that didn’t feel worth it to me. There are some pre-built stands on the market offered by some companies for around $80, but, to my frugal sensibilities, were way out of my budget.
Surely there had to be a simple (and affordable) solution…
That’s when I came across this freestanding metal stand; AND IT WAS ONLY $30 WITH FREE SHIPPING (for the contiguous US). I honestly thought it was a scam at first, since these stands are very well built, and given the cost of materials rising since the pandemic and the tariffs, it was a shockingly low price.
It turns out this company clears out excess inventory from other businesses, and sell these items at a mega discount. I’m all about reducing, reusing, and recycling, so, this was extra up my alley. I can say without a doubt that this is the most affordable solution for floating acoustic sound panels in this manner. Unless of course you’re a super skilled carpenter and can build nice stands out of wood. But if you’re more skilled at chopping sounds than wood, you’ve come to the right place!
HERE’S A LINK TO THE MAGICAL METAL FLOOR STANDS


These metal stands were originally intended as hand sanitizer stations, so, they have this large metal mounting plate at the top. This is where you can mount your panel to the stand. For me, I’ve got two types of sound panels to mount using these stands. The first one is a RealTraps 2’x4’x2″ panel, which has a prefab metal frame with cross-bars on the back of the panel. It turns out, this perfectly slipped around the metal plate.
The other panels I have are DIY wood-framed panels (ok I have some carpenter skills) that are normally hung using picture wire. So, the only modification I needed was a wooden cross beam with some L-Bracket corner braces. This allowed the panel to be attached to the metal stand in a similar manner as the RealTrap panel. To be clear, the cross beam sits on top of the metal square column. So after some tedious measuring to match the height of the RealTrap, I landed on the result below. It turned out great. That’s my father-in-law’s workshop FYI. I swear I’m an amateur carpenter!


Other things worth mentioning about these stands:
-At 28lbs, these are quite heavy, and thus, very sturdy and not prone to tipping over.
-The come with rubber feet so they won’t scuff up your studio floors.
-The metal plates have many holes in them, so, you have many mounting options if you don’t want to use the cross-beam method
-Before mounting panels to them, they make an awesome metal ringing sound when you ping the base plate; make sure to record them!
-The shipping is only free to the contiguous United States. Hopefully shipping elsewhere isn’t terribly expensive, since that is a big part of this bargain buy.
If you have any questions about this “build”, please reach out and I can update this post to add more information. The product page for the metal stand has all the dimensions listed in case you are curious.
On a final note, no, I’m not paid by this company to advertise this product. They did indeed include my panel photos on the product page when I told them how I use the metal stands, which was kinda neat. I certainly asked them if they could do a commission link for the product, but they said they don’t support that sort of thing. Either way, it’s a really elegant solution and I hope it can help you out with your sound studio design.
Take care and have a good day!
Mike

Hi! I just wanted to drop a quick thank you. I’ve been working on audio treating my home office as I work to transform it into more of a home studio and I’ve been building acoustic panels. I ran across the need to have some panels stand against a surface I couldn’t drill into, and was searching all over the internet and going a little crazy trying to figure out how to do it. Building my own stand, buying an expensive one, then I found your article. This was absolutely the simplest, most cost efficient approach to creating a standing acoustic panel that I have come across. You saved me a ton of money and time and I just thought you should know how helpful your instructions and images were. I’d be happy to share some photos of my finished product with you if you’re interested. Either way, thanks again for putting quality content out into the world.
That’s awesome to hear Scott! That was exactly the point of my article ; to save others the time, money, and headache I was going through before I stumbled across this solution. Thanks for sharing. I have no idea if my website even supports images in the comments so you can hold off, but I’m sure other audio forums would benefit from seeing your solutions as well. Happy sound making!
Hey! This is super cool.
I have these panels: https://www.gikacoustics.com/products/classic-bass-trap-panel?variant=52021482225877
These are from GIK Acoustic. Do you think it would work with them? I have the 2x4ft Rectangle version with 6″ thickness
I also have a question, how did you attach the horizontal beams? It’s not really clear for me.
Thanks a lot!
Hey Arman, I’m glad this could potentially work as a solution for you. It’s tough to say if the stand will be able to support he 6″ GIK panel, however, these metal stands are indeed VERY sturdy and bottom-heavy. So, I bet they will work, but even if they didn’t, all you would need to do is add more weight to the base somehow, and that should in theory solve any tipping potential.
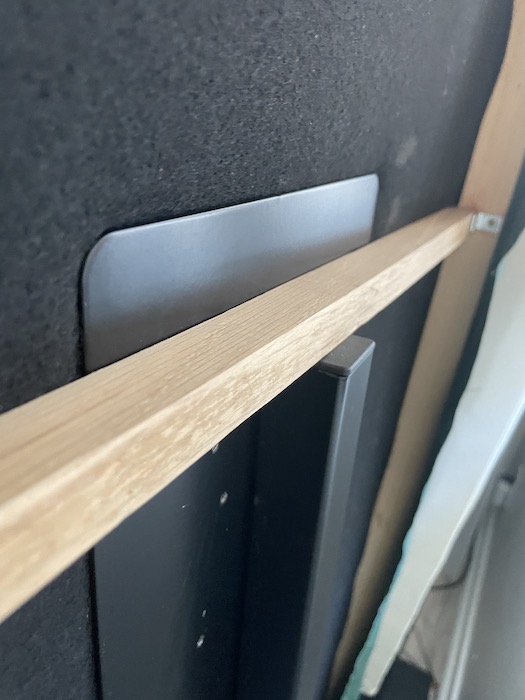
In terms of how the cross beam works, it actually just sits on top of the metal square column which sticks out from that metal faceplate. Also, I updated the article to spell out that I used L-Brackets for the installation (I left that detail out originally). Here’s a close up photo to highlight how the panel sits on the column.